Search This Blog

Friday 26 December 2014

Merry Christmas and Blessed New Year!

As it was Christmas Day yesterday, I am a day late with this post. However, I still hope all my blog friends enjoyed a wonderful day and I wish you all a Blessed and Prosperous New Year.

I just wanted to post a couple of photos showing my progress on the leaf art quilt.


You can slowly see the leaf forms, dimension, and colour developing. So far there is no detail on the leaves and that will be added after all the leaves have been placed. I'll be predominantly using my sewing machine to add stitched details such as veins grades of colour and outlines to enhance the leaves. So far I am pleased with the way it is shaping up.

Thursday 18 December 2014

Work on the Leaf Art Quilt Has Begun

As most of my Christmas projects are complete (a week before Christmas) I can finally put some attention to my next project. It has been percolating in my head for about a month as I make decisions on how it will be done, which fabrics to use, how large it will be etc.

As you know I did various paintings of curled up Fall leaves so I chose one of them to make into an art quilt. I traced the original painting and then enlarged it on my photocopier. I have decided to make it about 24"X 24" so it wasn't a big deal to enlarge that way. If I had planned to make it larger, I would have gone to Staples and had them print a copy off on their large format printer.

Tracing and design enlarged

I've decided to put together this quilt with applique, which is a different method than I normally use for my art quilts. Applique is when pieces of fabric are put on top of a background fabric. These pieces of fabric can be sewn on by hand or machine or, as I have decided to do, ironed on with a special adhesive. I am using Heat N Bond and ironing it onto the back of my fabric before cutting out the pieces. Once the pieces are cut out, I remove the backing paper and iron the piece onto my background fabric.

So once I have my enlarged pattern, I tape several pieces of tracing paper together and retrace the enlarged pattern onto it.

Tracing paper on top of original enlargement

I chose my background fabric knowing I wanted it to look somewhat like the ground but not so dark as to lose the leaves on it. I ended up with an ecru fabric with spatters on it. It looks like a sun-drenched sandy ground. I cut the background fabric to size and placed the enlarged tracing on it.

marked each leaf with a different colour so I could see which leaf had to be completed first.

The code letters and symbols in each shape indicate the colour of fabric to use for that shape.

Using my original painting I chose the colours of fabric I wanted to use.

Enlarged tracing is placed on top of the background fabric so I can determine where each piece needs to be placed.

Then I use more tracing paper and trace each piece separately. I then cut that piece out and place it on the corresponding fabric and cut that shape out of fabric.

Tracing paper patterns

Once the piece is cut out of fabric, I place it under the large pattern tracing and position it on the background fabric and then iron it on. I started with the shadows because the are the farthest part of the leaf away from me and everything else overlaps them.

I use sharp nail scissors to cut the pieces out.

This shows you how I use the tracing to help me position my pieces.

This is as far as I got today. With the shadows in place, it will help me to position the rest of the leaves properly.

I'm hoping I'll have more time over the Christmas holidays to work on it, so stay tuned for updates.
To all my blog friends, I wish you a Wonderful Christmas and a Blessed New Year!!

Thursday 11 December 2014

Inspired By All Things Christmas

Well, it so happens that I'm snowed in today. We're having a snowstorm and it's the perfect day for that because it is my art day and I don't have to go anywhere but downstairs to my studio. Yay!
Due to the fact that I'm working on lots of things for Christmas, I can't really blog about them yet and post pictures so I've decided to blog about the Christmas cards I've created over the years.

I don't often send store bought Christmas cards. I make them myself. Sometimes they are fabric, sometimes they are done with watercolour pencils and sometimes they are painted. When I've finished creating the image, I take a photograph of it and load it into my computer and crop the photo. Then I either print the images off on my own printer or take them to Staples and have colour copies made or I send the photo file to Shutterfly or Mixbooks via my computer and have them printed into cards which are then shipped to me. Once I have coloured copies I cut them out and glue them to cardstock that is folded into a card. I love to give something I've spent some time on to create and comes from my heart.

This Cardinal was done in fabric.
This one was done with watercolour pencils.
This one was also watercolour pencils.
Watercolour pencils
Another fabric creation with star bead embellishments
and a cancelled Christmas postage stamp.
These last three were also done with watercolour pencil
and were printed by Mixbooks. They are a series of
paintings I did from photographs taken when I visited
my daughter in the Yukon Territories a few years ago.


Thursday 4 December 2014

Southern Vacations and Christmas Inspiration

I missed blogging last week due to the fact that I was in the Dominican on vacation. I am inspired by the different plants that grow there: palms, bougainvillea, hibiscus, cactus, flowering trees, and also by the beaches and water. We were only there for a few days but I did manage to do a couple of sketches while sitting on the beach.


I have also been working on this year's Christmas card. This year I set up a still life display and drew and painted it with watercolour. I wasn't really happy with the first one I did so I rearranged the set up and did another one. Below are some sections of the first painting I did to give you an idea of what the card will look like.


Thursday 20 November 2014

Inspired by the Falling Leaves Continued

This past weekend the leaves finally all came off the trees and we were able to rake the whole property. And just in time because now the lawn is covered with snow. Luckily, I brought a few wonderful fall leaves indoors so I could continue to sketch and paint them.

Last week I told you I was inspired to make a larger art quilt from the leaf drawings I've been doing. I have since drawn and painted a few leaf arrangements in order to make a pattern.


I used some of the same leaves in each painting but set them up differently. The top painting was done last and you can see how the colours of the leaves have changed from sitting around for a week. The colours are less vibrant. They have become more brown in colour. So I've learned something and that is, I have to paint them early in the fall to get better colour. Now I have to decide which set up to use for my quilt. Or perhaps I'll do them all.

Thursday 13 November 2014

Inspired by the Falling Leaves

I have raked my yard twice with the help of my son and his family. But some of my trees are still full of leaves and the ground is covered AGAIN! I have to tell you that raking leaves is not a favourite job of mine. And when you have to do it more than once in a season...well...that makes it my least favourite task.

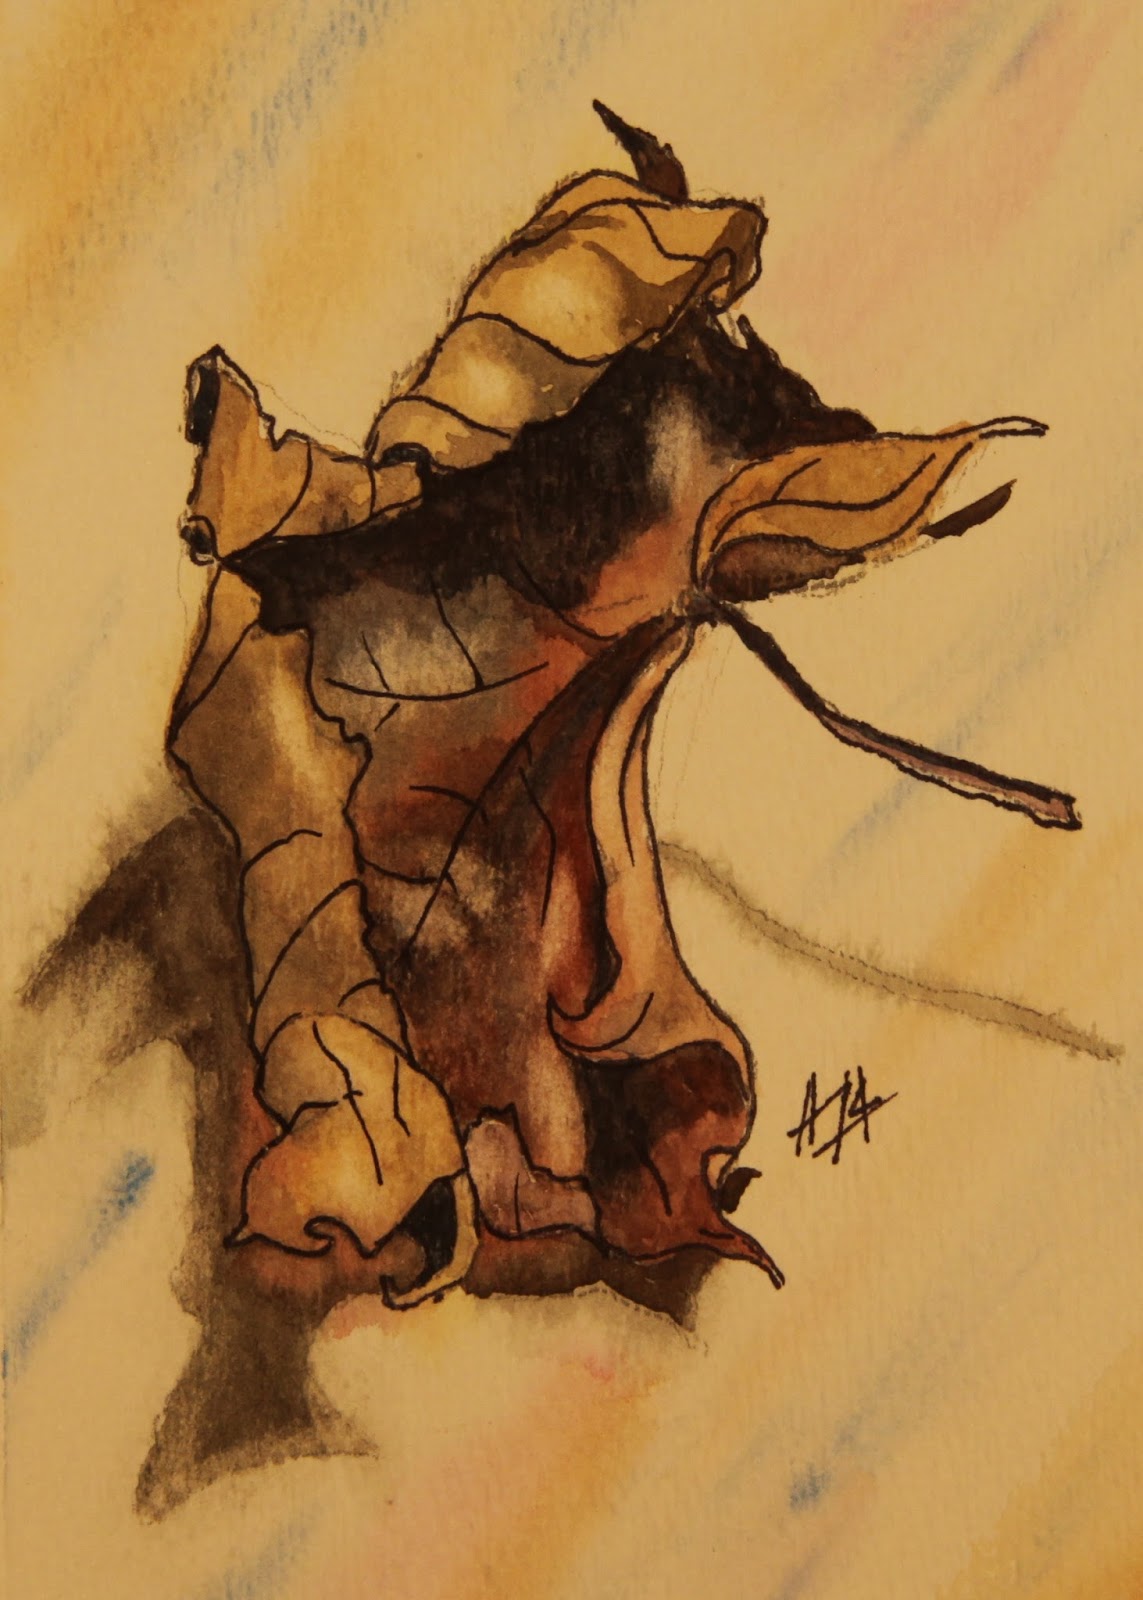
However, leaves are the most interesting things to sketch and paint as they dry up and curl. I wrote about how I was inspired by them a few weeks ago. I also posted the sketches I did of them. Well, this week I was inspired to make some fabric cards using the sketches as a pattern. I really like the way they turned out.

I traced my paintings onto tracing paper making sure to distinguish all the different values and colours.


Then I photocopied the tracings so I could mark them with numbers for each different outlined shape or value so I knew where to position the pieces.


Then I selected some fabric that were the colours of the leaves and had interesting texture on them. It was a good way to use up some of the small fabric scraps I had left over from other projects. (You know I don't throw any of it out).


Using another piece of tracing paper, I traced each shape separately and used the tracing paper as a pattern to cut the shape out of fabric. Note that I ironed a product called Heat N Bond to the back of the fabric before I cut the shapes out. That way each shape has a backing on it that will adhere to another piece of fabric (in this case the background fabric) when it is ironed.
Here is where it becomes tricky. I have to determine which pieces to put on first as I often overlap the pieces to get the look I want.


In the photo above I have laid down the shadow of the leaf and the underside of the leaf that shows because of the leaf curl.


Here you can see how I built up the leaf by adding the lighter coloured top or outside pieces of the leaf. Once this was completed, I free-motion stitched around the edges of the leaf to give it some dimension with my sewing machine. I also free-motion stitched the veins and the stem of the leaf.


Adding a phrase or word and some embellishments, the fabric card is complete.

This activity has now inspired me to make a larger art quilt with curling fallen leaves on it. So this afternoon I will do some more leaf sketching with that project in mind. Depending on how far I get with that, I may blog about it next week. So stay tuned..............

Thursday 6 November 2014

Sketchbook Skool Week 2 and 3

Week two of my Sketchbook Skool course was on "Selfies". That is, self portraits. I did a few of them while looking into a mirror but OH they turned out bad. We were not allowed to use a pencil. We were only allowed to use a marker or a pen. You know what that means...no erasing. What you put down is what stays down. I am sharing the best of 3 that I did and that gives you an idea how bad the others were. What's worse is I can't draw without my glasses on and I don't like drawing them on my face. I was also allowed to do a drawing from a photograph which I haven't done yet so then I can leave the glasses out of the drawing.


Week 3 was on continuous contour line drawings. This means you choose something to draw but you draw the outline of the object or objects and any detail you'd like to include without lifting your pen off the paper. It's not as easy as it sounds because you have to try not to repeat a line or go back on the same line.


This was my first attempt and as you can see I couldn't get back to complete the other side of the large vase. I started at the top on the mouth of the vase and ended where the dot is on the back of the bird. I did go back on some lines though. I'll have to do more of this to practice. I do think it is an interesting drawing, however. Then we were told to do a continuous contour line drawing on watercolour paper and then paint it.


I used the same subject but doing it the second time, I was able to plan my route so I could get the whole drawing in. Even though the artwork isn't fantastic, I do learn something every time I try a new technique and that's exciting.

Thursday 30 October 2014

Inspired by Autumn

Well, it's that time of year again. As the leaves turn red, orange and brown, the weather turns cooler and the wind picks up, we know we'll be out in our yards with the rakes. We have an abundance of trees in our yard and so I try to put off raking until everything is down. The thing with doing that is, it becomes such a big job to get the leaves off the property and into the ravine. So I was out there yesterday trying to get a jump on the job and my son was over the day before also trying to clear some of it away. When I look out my window today, it seems as if nothing was done.

After the raking, I brought in some of the curled leaves. I really like to sketch and paint these. Their shapes are unique and the colours are interesting and there is just something about trying to duplicate them on paper that I enjoy. A crumpled and curled leaf is much more interesting than a fresh flat leaf.


Thursday 23 October 2014

1000 Quilt Inspirations


Above is the cover of the book some of my work is published in. It is currently at the publishers and will be released in the New Year. I'm really excited to be included in the book and will be purchasing one for myself. It will be available on Amazon.com.

Below is a description of the book and a blurb about the book's author Sandra Sider.

Book description:


As one of the core, traditional crafts, quilting is enjoyed by countless enthusiasts around the world - and its popularity is only growing. This collection of one thousand quilt DETAILS builds upon this interest, showcasing some of today's most innovative and beautiful WORK. See how others utilize color and design elements to craft creative pieces. Gain inspiration from their variations and intricate techniques. Maybe even CONSTRUCT your own original quilts. Whether YOU ARE a quilter or a collector, a craft-lover or an art enthusiast, 1000 Quilt Inspirations is sure to inspire your admiration and appreciation of the art of quilting. It's also likely to get you itching for some fabrics of your own!

Author Bio:


Dr. Sandra Sider, a New York quilt artist and independent curator, has published articles and reviews concerning fiber art and other aspects of visual culture for three decades. Her graduate degrees include an M.A. in art history from the Institute of Fine Arts, New York University. She was President of Studio Art Quilt Associates (2010-2013), and is Consulting Curator for the Texas Quilt Museum.

Sketchbook Skool
I also started Sketchbook Skool again last Friday and had a couple of homework assignments. I guess this course is supposed to stretch me but they have me drawing things that I don't normally draw and in a different way that normally do. I'm not too impressed with my final products but perhaps I'll learn something from them.


For our first homework assignment we were supposed to draw a piece of toast. What do you think? Does it look like toast to you?


The second assignment was called Fast and Slow. We were to paint the shape of what we were going to draw very quickly with a paint brush and then go in afterward with a pen or marker and draw the details. This was one of my orchids.

Thursday 16 October 2014

Sketching Again

I usually carry a small sketch book with me in my purse just in case I have to wait somewhere or I have an opportunity to do a small sketch. This week as I was having coffee I did a sketch at the Garden Centre of the front desk. It was very challenging because the guys behind the desk kept moving or posing and customers came and went very quickly. That is the one challenging thing about sketching from life. You actually have to try to memorize positions of people to get them into your drawing. I didn't even try to get a likeness, however, those who frequent the Garden Centre might be able to figure out who they are.
It isn't very busy there at this time of year so I could do the sketch in about half an hour, however, I had to finish it at home. I had the basics in and filled in some of the details at home as well as painting it with watercolour.


 I also did a sketch of one of our employees. Some of you may know him. I didn't do this on location. It was done from a photograph I took earlier in the year.


And I have also been busy updating the journals for my grandchildren and started a new one for the latest addition to our family, Samuel. The sketches below capture some of our time at a rented cottage this summer.

The background of this sketch is a piece of a painting
that Paul did.