Search This Blog

Thursday, 16 January 2014

Challenge Stress

The title above can be understood in two ways. Remember the Challenge I blogged about last week that I wanted to enter? Well, it's STRESSING ME OUT! I think I know now why I never bothered to enter challenges in the past.

The more I worked on the little quilt that I'm doing for this Garden Challenge, the more I hated it. So before I used up all my painted tea bags, I stopped. I really didn't like the background I had done with the acrylic paint. It was too bold and when I applied the painted tea bags to it, you couldn't tell they were there.

So yesterday, I had decided to drop the challenge.....the easy way to eliminate stress. Besides, I have a million and one other projects in my head that I want to do. Why should I spend time on something I really didn't like to do anyway?

But.....this morning when I went into my studio where my painted tea bags were still sitting on my table, they continued calling to me to try to complete the challenge. I have to admit, my first attempt did teach me something about the medium I was using and that was that I cannot put the darker painted tea bags on first. Because the tea bags are transparent you see the dark right through so when I was trying to put a red flower over the blue sky it wasn't reading as a flower. Along that same line of thought, I also learned I could layer the tea bags to get darker shades.

With my new plan and the things I learned, I began again. Which brings me to the second understanding of the title of this blog. Challenge Stress. Stress can be a challenge in itself to overcome and with my new plan and the headway I'm making on the project, I think I've got it on the run. The stress is leaving, however, I still have a deadline to contend with and I'm all out of tea bags! I'll be drinking a lot of tea today in order to finish the project in time to submit it.

I started with a plain cream-coloured cotton as the background and fused the painted tea bags directly on it. I like the delicate look of the tulips which comes from the transparency of the tea bags.

I still have to put more leaves and greenery on the bottom, then sandwich it and quilt it before the January 24th deadline. I'm much happier with it. Now for a cup of tea.

Thursday, 9 January 2014

What Creative Possibilities Will This New Year Bring?

Well, it has been a while since I have blogged and that has mostly to do with the weather, which left us without power and gave me lots of extra work to do. It also has to do with the fact that we've just come through the Christmas and New Year's holidays and those times are so filled with extra company, festivities, and a general lack of routine. So, I didn't get a lot of art making done.

But it is now a new year and it's time to make art a priority again.

One of the first things I did was to become a member of SAQA (Studio Art Quilts Association). This is a group that promotes the making of Art Quilts which is what I do as opposed to traditional quilting. I received their latest Journal and it is filled with inspiring quilts and articles. I'm hoping that this membership will help me grow as an art quilter and maybe give me the confidence to enter some of my work into Juried Art Quilt Shows. I have attempted to enter in the past but was rejected for various reasons. Perhaps this membership will help me to become a better art quilter and enable me to produce higher quality quilts with better technique.


Another thing I started was a small 8 X 10 inch quilt for a challenge from the Quilting Arts Magazine I subscribe to. The challenge is called "How does Your Garden Grow?" The rules are that it must be 8 x 10 inches, it can be made with any materials but must be quilted, and two low-resolution images must be sent via email by January 24th. The deadline is looming and I haven't gotten very far in the process. I am planning to use painted tea bags again. I felt that my last attempt at using them was quite successful.

A sampling of some of my painted tea bags
I also created a background for the quilt onto which I will sew the tea bags. This background is just plain off white dropcloth. I used a gel plate to print onto the fabric. A gel plate is a clear rubber slab that you apply  acrylic paint to and then print with it on fabric. Before these gel plates were available in the stores, artists used to make them with real gelatin. The drawback was that they could only be used so many times and then they were garbage. I haven't totally got the knack of using the gel plate but I gave it a try.

The "Gelli" Gel Printing Plate in the package

Here it is ready to accept paint. You can see, if you look closely
that I've painted it loosely with yellow at the top.
This is the background gel print for my "Garden " quilt
I'll keep you posted on it's progress and whether or not it is accepted into the challenge.

Thursday, 19 December 2013

Inspired by the Past

This week I found some lino-cuts my dad had made years ago at Christmas time to produce his own Christmas cards from. (Now you know where I get my card making love from.) A lino-cut is an image that is carved into linoleum, then inked and pressed onto paper (or I'm pretty sure it would work on fabric too). It's like a stamp which are widely available these days in an abundance of different designs. I have many commercial stamps as well but there is something about a home made unique design that I love. However, a stamp is inked with an ink pad and a lino-cut is inked with printing ink that is rolled onto it. It's a little messier than an ink pad but it stays wet longer to give you time to ink the whole lino-cut and get it down on paper before it drys. Lino-cuts tend to be bigger than stamps.


Images can be carved into a number of different materials. One is the linoleum which is soft enough to carve into but still rigid enough to ink and print larger images. Another is a very soft rubber that comes in sheets. This is easy to carve but also much easier to make a mistake in if your carving tool slips and if you try to make a larger image, it is quite floppy and hard to print. The rubber is easy to cut into smaller sizes for smaller stamps. I've also made tiny stamps out of wine bottle corks which are perfect to use with a stamp pad.


This week when I was working in a journal, I wanted to stamp the year on a page, so I carved myself a set of numbers from the rubber. When doing numbers or letters, I have to remember to carve them backwards so when they are printed they come out the right way.


When the numbers worked out well, I decided to try some other designs to use in my journals. One was a flower design as above and the other a swirl design. I have lots of rubber left over. Any suggestions as to what I should carve next?


Thursday, 12 December 2013

A Cup of Tea and an Inspiration

In an attempt to get more liquids into my body (I'm not fond of plain water), I've been drinking more tea. I find it interesting that tea bags are made of paper that is neatly folded around tea leaves but that's not what intrigues me about it. It's the fact that those tea bags don't fall apart even after soaking in hot water for long periods of time. So I took one apart, opened it up and rinsed the leaves down the drain and let it dry. The texture is that of Japanese rice paper. It's delicate yet strong. I've read that artists use tea bags in their art and because I like the texture of the bag so much, I decided to try it in my quilt art. I wanted to find out if I could paint it and sew it.


This is what I found out.

Yes, you can paint the tea bags. On the left is an unpainted tea bag. I painted a number of tea bags with liquid acrylic paint that I diluted with water. I used three different colours on each tea bag. Three different blues on the blue ones and three different earth tones on the brownish ones. What it nice it that the tea bag remains somewhat transparent with the diluted paint. These colours reminded me of sand and water so I decided to use that theme for my quilt.
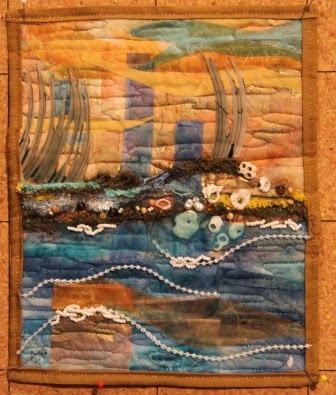
Here I have machine quilted layers of painted tea bags to quilt batting and a backing fabric. I used a copper metallic thread for the quilting to add a bit of sparkle. Next I will build layers on this with embellishments.
I added embellishments such as organza, yarn, beads, sea shells to flesh out my theme of sand and water.
Here is the finished piece entitled "Sand and Sea". It is only 8" X 10" which is the perfect size for an experiment. I'm pleased with the way it turned out and learned that I can paint and sew the tea bags very easily and they hold up well. However, it probably wouldn't be a good idea to wash the quilt. Perhaps, one day I'll try a larger quilt with tea bags. I guess I'll be drinking a lot of tea in the future.

Thursday, 5 December 2013

Self Portraits


Have you ever wondered why artists do self-portraits? Well, I can assure you it is not because we are vain. More often than not, our self-portraits don't do us justice. No, we don't make self-portraits because we think we are photogenic. Perhaps way back before the camera, it was a way of leaving a part of yourself for posterity just like regular portraits. But now we have cameras and really, there is no need for a hand made portrait.

Portraits are made because you can put a little of the subject's personality into a painting or a drawing. This comes by the close observation that is needed to make a portrait accurate. It also helps to know your subject well. And who does an artist know better than themselves?

Another reason artists do self-portraits is that it is cheaper and easier to use yourself as a model than hire someone so you can get your practice at portraits. And family members just don't want to sit for the duration of a portrait. You might ask, well then just take a photo and paint from that but there is something about doing a live portrait that helps with an accurate depiction.

So yes, we artists use a mirror to do a self-portrait which is why sometimes the eyes don't quite look natural. It is difficult to look up into a mirror and then down at your paper to do the sketch. You are constantly changing your perspective. It is quite a challenge to get a likeness in a self-portrait.

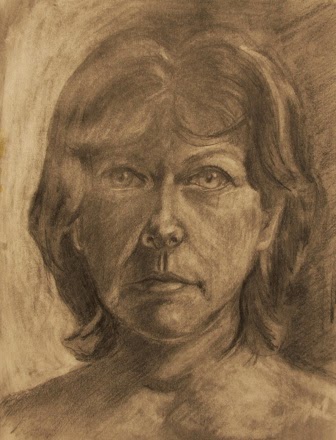
I am going to be a little vulnerable now and show you some of my self-portraits. I do them for practice so when they don't really turn out looking like me, it doesn't bother me. I have done lots of portraits of my family over the years and some of them they will never see because they turned out so bad but I don't throw them away. They give me a record of how I'm doing and if I'm improving.

This one was done in 1995
2004
Done for a drawing class I was taking at the time.
2012
2013
Well, although they're not perfect, I do feel I'm improving and there is a bit of a likeness in all of them. They are still enjoyable to do and a great learning tool.

Thursday, 28 November 2013

Zendoodle Quilt Update

Well, I had a meeting with the women who will be helping me with this quilt and we agreed that this is a nice contemporary design but perhaps a bit of a challenge because it is not a traditional design.
We spent some time together teaching and learning how to piece the blocks together using freezer paper patterns. We practiced putting a block together and it turned out pretty decent. So each woman has a package with a pattern and some fabric which they took home with instructions to make 8 small 4.5" x 4.5" blocks which we'll put together to make 2 8.5" X 8.5" blocks. When we meet again with our small blocks we'll decide how we want to sew them together because there are a number of different designs you can get depending on how you position them. You can see that below and in my blog of 3 weeks ago.

This is the selection of fabric we'll be using for our Zendoodle Quilt


Below are four 8.5" X 8.5" completed blocks.


Thursday, 21 November 2013

Day's End and New Life

I've been waiting for my sunset painting to be delivered to it's owners before I posted it here on my blog. Below is the final painting.


I love to celebrate new life. It is such a precious gift. I do that by drawing baby portraits with graphite on paper. Here is the latest.


I was cleaning out my garden this past week and the rose bush on the south side of my house was still blooming so I clipped off the last roses and put them in a vase in the house. Before they disappeared for another long winter, I sat down and sketched them.