Search This Blog

Thursday 19 December 2013

Inspired by the Past

This week I found some lino-cuts my dad had made years ago at Christmas time to produce his own Christmas cards from. (Now you know where I get my card making love from.) A lino-cut is an image that is carved into linoleum, then inked and pressed onto paper (or I'm pretty sure it would work on fabric too). It's like a stamp which are widely available these days in an abundance of different designs. I have many commercial stamps as well but there is something about a home made unique design that I love. However, a stamp is inked with an ink pad and a lino-cut is inked with printing ink that is rolled onto it. It's a little messier than an ink pad but it stays wet longer to give you time to ink the whole lino-cut and get it down on paper before it drys. Lino-cuts tend to be bigger than stamps.


Images can be carved into a number of different materials. One is the linoleum which is soft enough to carve into but still rigid enough to ink and print larger images. Another is a very soft rubber that comes in sheets. This is easy to carve but also much easier to make a mistake in if your carving tool slips and if you try to make a larger image, it is quite floppy and hard to print. The rubber is easy to cut into smaller sizes for smaller stamps. I've also made tiny stamps out of wine bottle corks which are perfect to use with a stamp pad.


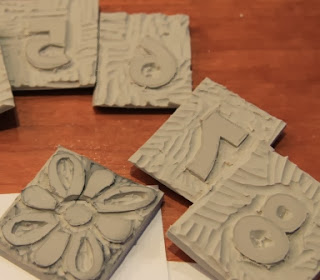
This week when I was working in a journal, I wanted to stamp the year on a page, so I carved myself a set of numbers from the rubber. When doing numbers or letters, I have to remember to carve them backwards so when they are printed they come out the right way.


When the numbers worked out well, I decided to try some other designs to use in my journals. One was a flower design as above and the other a swirl design. I have lots of rubber left over. Any suggestions as to what I should carve next?


Thursday 12 December 2013

A Cup of Tea and an Inspiration

In an attempt to get more liquids into my body (I'm not fond of plain water), I've been drinking more tea. I find it interesting that tea bags are made of paper that is neatly folded around tea leaves but that's not what intrigues me about it. It's the fact that those tea bags don't fall apart even after soaking in hot water for long periods of time. So I took one apart, opened it up and rinsed the leaves down the drain and let it dry. The texture is that of Japanese rice paper. It's delicate yet strong. I've read that artists use tea bags in their art and because I like the texture of the bag so much, I decided to try it in my quilt art. I wanted to find out if I could paint it and sew it.


This is what I found out.

Yes, you can paint the tea bags. On the left is an unpainted tea bag. I painted a number of tea bags with liquid acrylic paint that I diluted with water. I used three different colours on each tea bag. Three different blues on the blue ones and three different earth tones on the brownish ones. What it nice it that the tea bag remains somewhat transparent with the diluted paint. These colours reminded me of sand and water so I decided to use that theme for my quilt.
Here I have machine quilted layers of painted tea bags to quilt batting and a backing fabric. I used a copper metallic thread for the quilting to add a bit of sparkle. Next I will build layers on this with embellishments.
I added embellishments such as organza, yarn, beads, sea shells to flesh out my theme of sand and water.
Here is the finished piece entitled "Sand and Sea". It is only 8" X 10" which is the perfect size for an experiment. I'm pleased with the way it turned out and learned that I can paint and sew the tea bags very easily and they hold up well. However, it probably wouldn't be a good idea to wash the quilt. Perhaps, one day I'll try a larger quilt with tea bags. I guess I'll be drinking a lot of tea in the future.

Thursday 5 December 2013

Self Portraits


Have you ever wondered why artists do self-portraits? Well, I can assure you it is not because we are vain. More often than not, our self-portraits don't do us justice. No, we don't make self-portraits because we think we are photogenic. Perhaps way back before the camera, it was a way of leaving a part of yourself for posterity just like regular portraits. But now we have cameras and really, there is no need for a hand made portrait.

Portraits are made because you can put a little of the subject's personality into a painting or a drawing. This comes by the close observation that is needed to make a portrait accurate. It also helps to know your subject well. And who does an artist know better than themselves?

Another reason artists do self-portraits is that it is cheaper and easier to use yourself as a model than hire someone so you can get your practice at portraits. And family members just don't want to sit for the duration of a portrait. You might ask, well then just take a photo and paint from that but there is something about doing a live portrait that helps with an accurate depiction.

So yes, we artists use a mirror to do a self-portrait which is why sometimes the eyes don't quite look natural. It is difficult to look up into a mirror and then down at your paper to do the sketch. You are constantly changing your perspective. It is quite a challenge to get a likeness in a self-portrait.

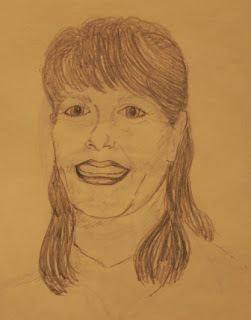
I am going to be a little vulnerable now and show you some of my self-portraits. I do them for practice so when they don't really turn out looking like me, it doesn't bother me. I have done lots of portraits of my family over the years and some of them they will never see because they turned out so bad but I don't throw them away. They give me a record of how I'm doing and if I'm improving.

This one was done in 1995
2004
Done for a drawing class I was taking at the time.
2012
2013
Well, although they're not perfect, I do feel I'm improving and there is a bit of a likeness in all of them. They are still enjoyable to do and a great learning tool.

Thursday 28 November 2013

Zendoodle Quilt Update

Well, I had a meeting with the women who will be helping me with this quilt and we agreed that this is a nice contemporary design but perhaps a bit of a challenge because it is not a traditional design.
We spent some time together teaching and learning how to piece the blocks together using freezer paper patterns. We practiced putting a block together and it turned out pretty decent. So each woman has a package with a pattern and some fabric which they took home with instructions to make 8 small 4.5" x 4.5" blocks which we'll put together to make 2 8.5" X 8.5" blocks. When we meet again with our small blocks we'll decide how we want to sew them together because there are a number of different designs you can get depending on how you position them. You can see that below and in my blog of 3 weeks ago.

This is the selection of fabric we'll be using for our Zendoodle Quilt


Below are four 8.5" X 8.5" completed blocks.


Thursday 21 November 2013

Day's End and New Life

I've been waiting for my sunset painting to be delivered to it's owners before I posted it here on my blog. Below is the final painting.


I love to celebrate new life. It is such a precious gift. I do that by drawing baby portraits with graphite on paper. Here is the latest.


I was cleaning out my garden this past week and the rose bush on the south side of my house was still blooming so I clipped off the last roses and put them in a vase in the house. Before they disappeared for another long winter, I sat down and sketched them.

Wednesday 13 November 2013

Hola! Blogging from Mexico.

This week I am blogging from Mexico and as you know, I always take a small sketchbook, some pencils, some watercolour pencils and a few paintbrushes with me when on vacation. Due to the fact that I didn't bring a novel along to read, I've been doing some sketching.

Also, I usually blog on Thursdays and today is Wednesday. Wow, how relaxed am I to even get out of my routine! Actually, today we had some rain and so I decided to blog now rather than tomorrow when, if the weather is good, we'll be golfing first thing and hitting the beach in the afternoon.

We are really enjoying ourselves, however they've had an unusual amount of rain here this month and the courses are flooded making for challenging conditions. We've seen so much wildlife on the course too. We've seen gators on the course as well as animal called a coati, turkey vultures, grey fox, cranes, flamingo-looking birds that weren't pink but grey, iguana and lizards. Really interesting!

Below are the sketches so far. Enjoy!


Thursday 7 November 2013

Zendoodling and Quilt Design

I have been zendoodling again. Not because I needed to de-stress myself but because I am trying to come up with a quilt design. Our local Christian School is planning a Silent Auction as a fundraiser early next year and along with some friends, I'd like to construct a quilt to place in it.

As you know, I'm not really a traditional quilter. I prefer more contemporary styles of quilts and I don't often make a quilt to adorn a bed. My quilts are designed as art that can be hung on the wall. I'm not sure yet what this quilt will be but I'd like to do something in black, white and gray. And so because zentangles are also mostly done in black, white and gray, I decided to try to come up with a square adorned with zentangles.

I drew a 4" x 4" square in my sketchbook and divided it like I divide my landscape quilt patterns. In each space, I did a different zendoodle. While I doodled I consciously tried to keep my darkest darks in one corner and my lightest lights in another. This will enhance the overall design of the quilt when the blocks are put together.

Once the block was filled with zendoodles, I photographed it and brought the photo up in my computer. I don't have a fancy photo editing software but I've found that I can do a lot in Microsoft Word. I imported the photo into my Word program and copied it so I had two. Then I rotated the second photo 1/4 around. I copied the original photo again and rotated the third copy 1/2 the way around and then I copied the original again and rotated the fourth copy 3/4 the way around. When I had the four squares oriented the way I wanted them, I put them together to make a large square out of them. I was really impressed with the result.
This is the original zendoodle block.


The above blocks are a combination of four of the original block with the three copies rotated. I gives me the feeling of a kaleidoscope.
I was able to get four different designs from this one block using the rotation method however, I was sure I could get many more designs from this square by manipulating it in different ways. Next I tried designing by flipping the photo of the original block so it showed up backwards and upside down. Below are the designs I got with that method.


As you can see these 4 examples look completely different than the first 4 examples.
I am sure there are many other design possibilities with this same original block and I think I will continue to find as many as I can. Then we'll have to decide which method we want to use for the quilt project and what type of art we want to make. There's the possibility we go a completely different direction but if we do end up using this design in some way, I'll post the final project here on the blog.
 
This experiment has also inspired me to try it with coloured fabric. Oh so many projects in my brain! I can't wait to get started!

Thursday 31 October 2013

Pen Pal Painting Challenge

Do you remember this past summer, I told you I had signed up for a painting project which was called the Pen Pal Painting Challenge? Well, we had until August to finish it and mail it in. The Art House Coop would go through them and then mail them to another participant along with a card that told a little about yourself and some contact information in case you wanted to contact the artist of the work you receive back.

Well, I received my pen pal's project this past week! How exciting it was. There are participants from all over the world so I was quite surprised that my pal is from Saskatchewan. Below is the project I did and also the project I got back.


My Metamorphosis Project


My Pen Pal's project


I will sit down and write my pen pal to try to get to know this artist in Saskatchewan. Cool!

Thursday 17 October 2013

New Technique for Fabric Cards

Although I have recalled the Fabric Cards I've made, I am still making them and sending them out to people. In my experimentation, I came across another technique.

In this technique, I layer fabrics one on top of another and cut away layers to reveal the patterns underneath. First of all I collect a few fabrics that co-ordinate and come up with a plan for them depending on their colours.

One layer is the back of the card, the next is the quilt batting, and then I have 2 or three layers of co-ordinating fabric on top of that again. I then zigzag the edges of the sandwich together.

This is the back of the card, the quilt batting and the third layer of the top fabric.
Here I lay the second layer of fabric on top
This is the first layer of fabric which I hand dyed a pale blue colour.
 
The sandwich is zigzagged together and then I stitched on top.
I cut away the first pale blue layer from inside the stitched area
to reveal the second layer of fabric underneath. I then stitched
a design on another section of the card.
On the flower design, I cut away the first and second layers of
fabric to reveal the third layer of fabric.
I will then embellish the card with buttons, beads, or found items to add interest to it.

Here are a few others I've made with the same technique.