Search This Blog

Thursday, 27 February 2014

Rapid Inspiration

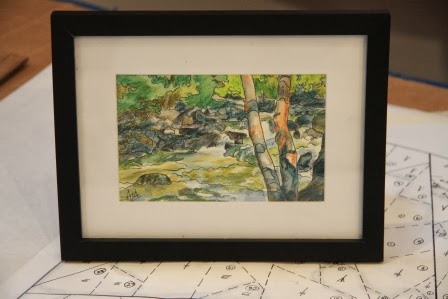
The last few weeks, I have been working on a pattern for a new art quilt. It was inspired by a sketch I did from a photo of rapids that we found on our canoe trip last year. The photo didn't inspire me but I was inspired by the colours I used in my sketch. That is why I like to do a sketch or painting of a subject before I turn them into quilts. It gives them more of an artistic flavour. Some would say it makes them more painterly.
This project will be a wall quilt 30" X 40".

Here is the completed pattern with fabric swatches. If you look carefully, you can see the two birch
 trees in the foreground on the right side of the pattern. They are the only things that go from the bottom of the quilt right to the top. They will be the focal point of the quilt with the rapids running behind them
 and rocks and forest in the background.

This is the 4 X 6" sketch I did of the scene and the source
of my inspiration.

These are my fabric choices.

First section complete. This is part of the background forest area in
the top right hand corner.

When making my art quilts in the past, I have tried to match up my thread colour with the fabric colour but this doesn't always work because I am always sewing two different fabrics together. If the fabrics are mostly the same type of colour and value, there's not too much problem but when I go from a dark area to a light area where the values are totally different, I run into trouble. I had one of my quilts rejected from a show because my stitches showed. This time I am working with lingerie thread (either white or black) in the bobbin and a clear thread something like fishing wire in the top needle. So far, in the section I have finished, the stitches cannot be seen.

I've also finished the small quilt for the Parks Challenge. It is 8" X 8" and I have to send the images in on April 4, 2014. I call it "Algonquin".


Thursday, 20 February 2014

Travel Journal

I'm planning another trip to Holland this year to see my dad and step-mom and am excited that my daughter will be travelling with me. She was in Holland once before when she was about 9 or 10. I thought it would be nice for her to have a journal in which she and I could write our experiences, feelings, and memories as well as fill with tickets, sugar packets, coasters, anything that we want to keep to help us relive the trip in the future. We could even do sketches in the journal to give it a really personal feel.

The journal is made of 3 sheets of 18" X 6" watercolour paper. I painted both sides of the sheets with liquid acrylic so that when I put glue on it or want to draw or write on it, it won't fade or bleed as it would with plain watercolour paint.

The 3 sheets folded in half will give us 10 pages plus the
cover and the back of the book


I then added some drawings and glued some dutch stuff onto some of the pages to give them a start so it would be easier to begin writing and adding to it once we are travelling. It is really hard to get started if you are faced with a white page. I think writers have the same problem.


I decided which page I wanted as my cover and wrote the word HOLLAND on it and the year. I then used Inktense Ink Pencils to colour the letters in. These pencils are water soluble and once they are dry cannot be removed or smudged.
To put the journal together I nested the pages, folded them in half and poked holes into the crease of the fold. Using a decorative pencil I bought at the dollar store and some Red, White and Blue embroidery floss, I sewed the pages together using the pencil as the spine of the book. With the left over floss, which I braided, I reinforced the pencil to the spine and added beads to the bottom of the floss for extra decoration.


Voila! Our Holland Journal is ready to pack into our carry-on baggage so we can start filling it out in the plane.


Thursday, 13 February 2014

Creative Negativity

Is negativity ever a good thing? Well, actually, yes, it is. In art it is, anyway.

I have been practicing a style of painting that I learned of some years ago in an art class at the Neilson Park Creative Center here in Toronto. It was taught by an Artist named Linda Kemp. She now has several books and videos out on the subject of "Negative Painting".

Negative painting is painting in the negative which means we paint around the subject instead of painting the subject. It is quite difficult to get your head around when you first begin and takes a lot of practice. I've used the technique in a few of my paintings but decided to really do some more practice with it so I purchased Linda's videos and have been watching them and then attempting to master it. I really like the effect of this technique.


The two little paintings above were inspired by some photos I took of the ice storm we experienced in Toronto in December. As you can see, I didn't paint the trees and branches, I painted around them to suggest they are there. As I mentioned earlier, you have to think about the spaces between the branches instead of the branches. It's quite a challenge.


Thursday, 6 February 2014

Working With the Right Tools

After my fiasco with the quilting of our table runner last week, I did some "googleing" on how to avoid puckering when machine quilting. There were several pieces of advice which I made mental note of to try but one proved to be the thing that worked best. Use a walking foot. This is a special foot attachment for sewing machines which helps guide the fabric layers under the needle evenly. Now, I had bought one of these many years ago and had never used it. It is used primarily when you quilt in straight lines. I have lately been quilting free motion and so I use a darning foot for that. Well, once I figured out how to attach the walking foot to my machine and started to quilt with it, I was amazed that I experienced no puckering at all. I was so relieved. The quilting is almost complete. It goes to show you that working with the right tools makes a whole lot of difference in the finished artwork.

You might think that after my Challenge rejection last week, I wouldn't jump into another challenge for a while. That was my plan but the next challenge was on "Art in the Park". I immediately thought of Algonquin Park where I and a group of women have been canoeing for the past two years and are planning to go again this year. I flipped through some of the sketches I had done of the trips and found the sketch I wanted to duplicate in fabric. I also thought that instead of using some new technique (such as tea bags) that I was still trying to figure out, I would use the technique I love to use in my larger quilts. Perhaps if I use something I am familiar with the result will be better and the piece will be accepted into the Challenge. So today I finished designing the pattern and choosing the fabric.

Pattern Design and photo of the sketch. I will be making
the canoe red for more interest.

Fabric choices

This will definitely be a challenge because the finished piece is only allowed to be 8"X8". So some of my fabric pieces are going to be tiny. The project is due in April which will give me some time to complete and I'm already finished the most time-consuming part. Here we go again.

Thursday, 30 January 2014

Just One of Those Art Days

This morning I woke up to a power outage. The good thing is that it meant I could still paint if I brought everything upstairs. However, I couldn't blog, I couldn't sew, and I couldn't do any other work on the computer like check if I had been accepted for the "In the Garden" Challenge.

I did bring my painting stuff upstairs and worked on a portrait of my grand-daughter that I have been working on for a long time. This painting is the second one I've attempted because the first one was not working out the way I wanted it to.
This is the first attempt. I quit before I put too much into it and
might just revisit it later. Being watercolour, I can still make
some changes to it.

This is the second attempt and it has potential. It is far
from finished but I kind of like what it going on.
The house was getting a little cold by this point so I went to visit my son and daughter-in-law for coffee and when I returned the power had returned and the house was warmer. This meant I could check the Quilting Daily website to see if I had been accepted into the challenge. Alas, my name was not there. Disappointment. Oh well, keep trying, maybe.

With the return of power, I could use my sewing machine and I needed to do some quilting on the table runner my friends and I had succeeded in putting together.


I'm happy with it, however, as I quilted it, it started to bunch and buckle. I've quilted three squares and I'm not happy so I will have to take it apart and come up with another plan. 

So you see, artists don't always have successful days and this one was absolutely not successful. When I have days like this, it is inspiration-sapping and I find it hard to continue or come up with an idea, that I think will work. From the past, I've learned to just work through it and eventually I receive success and the inspiration will return again.

I'm hoping that in next week's blog, I'll have some really positive experiences to share with you.

Thursday, 23 January 2014

In the Garden Challenge Complete

Well, with the help of some wonderful friends who drink tea, I've been able to complete the challenge....a day early, I might add. I've just sent the email with my images to Interweave who puts out the Quilting Arts Magazine I subscribe to. I will find out on January 30th if it has been accepted into the challenge. If it is accepted, I'll have to mail the whole thing to Interweave where they will photograph it for publication in their upcoming June/July issue of Quilting Arts.

I am a lot happier with the final piece. Once the tea bags had been fused onto the background, I machine quilted it, using a metallic thread in the sky for some sparkle. Then I embellished the piece with green beads, some dragon fly charms and a cross-stitch of a bumble bee to add some interest. It's titled "The Garden's First Blooms".  Hope you like it and thanks for the help!

It was so nice to be thinking about Spring during this
cold, stormy, snowy winter.


Thursday, 16 January 2014

Challenge Stress

The title above can be understood in two ways. Remember the Challenge I blogged about last week that I wanted to enter? Well, it's STRESSING ME OUT! I think I know now why I never bothered to enter challenges in the past.

The more I worked on the little quilt that I'm doing for this Garden Challenge, the more I hated it. So before I used up all my painted tea bags, I stopped. I really didn't like the background I had done with the acrylic paint. It was too bold and when I applied the painted tea bags to it, you couldn't tell they were there.

So yesterday, I had decided to drop the challenge.....the easy way to eliminate stress. Besides, I have a million and one other projects in my head that I want to do. Why should I spend time on something I really didn't like to do anyway?

But.....this morning when I went into my studio where my painted tea bags were still sitting on my table, they continued calling to me to try to complete the challenge. I have to admit, my first attempt did teach me something about the medium I was using and that was that I cannot put the darker painted tea bags on first. Because the tea bags are transparent you see the dark right through so when I was trying to put a red flower over the blue sky it wasn't reading as a flower. Along that same line of thought, I also learned I could layer the tea bags to get darker shades.

With my new plan and the things I learned, I began again. Which brings me to the second understanding of the title of this blog. Challenge Stress. Stress can be a challenge in itself to overcome and with my new plan and the headway I'm making on the project, I think I've got it on the run. The stress is leaving, however, I still have a deadline to contend with and I'm all out of tea bags! I'll be drinking a lot of tea today in order to finish the project in time to submit it.

I started with a plain cream-coloured cotton as the background and fused the painted tea bags directly on it. I like the delicate look of the tulips which comes from the transparency of the tea bags.

I still have to put more leaves and greenery on the bottom, then sandwich it and quilt it before the January 24th deadline. I'm much happier with it. Now for a cup of tea.